What is Rebasing?
Let's start off by distinguishing rebasing and merging, which are the two main ways of integrating commits between branches in Git. Using git merge to integrate changes is relatively simple and harmless. Merging will preserve the history (along with merge commits) of a branch and will give an accurate depiction of the branch's timeline. Git accomplishes this via a three-way merge, which involves the two latest branch snapshots from each branch (c3 & c4) in the merge and the nearest common ancestor (c2). A new commit (c5 the merge commit) will then be created to encompass the integration.
               c4
             /    \
c0 - c1 - c2 - c3 - c5
Rebasing is the other option for integrating work between branches in Git and it works a little differently than merging. Rebasing is simply replaying commits from one branch onto another. Don't be intimidated by the term "replay" here. You'll see it in the console when doing a rebase and it basically means applying commits to another branch.
Rebasing and merging are similar in that the changes will both use the nearest common ancestor to begin, but the way the commits are integrated from one branch to another during a rebase is completely different. Git will follow these steps.
- Find the nearest common ancestor between the two branches
- Save the diff of the two branches to separate files
- Reset the current branch to the latest commit of the branch to rebase onto
- Replay the changes from the diffs in order via new commits
This results in a commit tree that may look something like the one below. In the example, we create a branch called feature from main. After creating a commit (c4) on feature we rebase onto main, which now has an additional commit created after the feature branch was created (c3). To rebase feature on to main we can run git rebase main (with feature checked out) which will follow the steps we listed above and ultimately replay the changes in c4, resulting in a new commit c4'. One important thing to note is that since new commits are created in the process of a rebase, it is effectively rewriting a branch's history.
               c4 (feature)
             /
c0 - c1 - c2 - c3 - c4' (main)
That is how the standard rebase and merge features work. Next, we'll be going into the interactive rebase feature, which I think can greatly reduce the amount of anxiety around rebasing Git branches.
Using the Interactive Rebase
Rewriting a branch's history without knowing for sure what will be applied can be scary. This is where the interactive rebase comes in. The interactive rebase gives us a chance to see the commits that will be applied and even manipulate the commits before completing the rebase. The option to add to the rebase command is -i or --interactive. For example, from our previous scenario interactively rebasing feature onto main would be done with git rebase main -i. Running that command will open an editor (the default based on your Git config) and all of the commits to be rebased will be displayed in a list. From that list, we can drop, reorder, squash, and reword messages of the commits in the list. Let's take a closer look at all the available options.
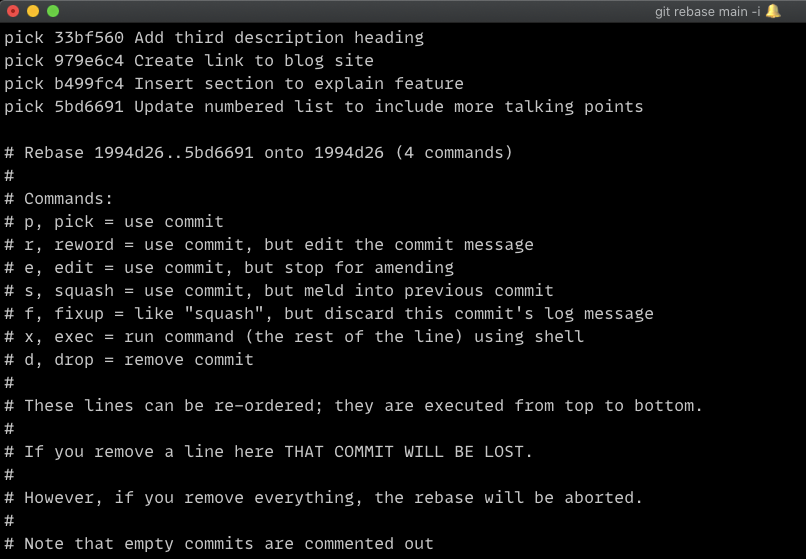
Rebase Menu Options
Here is an example of the editor window when running git rebase <branch> -i. As you can see commits to be rebased are listed first followed by several different commands that can be applied during the rebase. The default command for each commit is "pick". As noted in the menu, commits are applied from top to bottom. Reordering commits is as simple as changing their order in the given commit list. Once we have made the changes necessary, saving and closing the file will begin the rebase. Let's take a look at each of these commands and their purpose in the context of rebasing.
Pick
First up is the pick command and it is probably the most straightforward. As mentioned before and as you can see from the command option list, pick is the default command and it indicates that a commit will be applied in the rebase. So if we want to include a particular commit that would look like this.
pick 33bf560 Add third description heading
Reword
Next up is the reword command. This command is used to indicate that a commit will be applied in the rebase, but the commit message is different from the original. This may be useful if there was a typo or if a correction needs to be made in the original message. If we want to reword and apply commit 33bf560 that we picked above, we would update it to the following.
reword 33bf560 This commit message is different from the original
Edit
The edit command is up next and I think this one is especially interesting because it allows us to make more changes after a rebase has already been started. Let's say we use the edit command on the third commit in the commit list. The rebase will apply all the commits up to and including the commit that we've indicated with edit. Once the third commit has been applied the rebase will be paused. We can then make additional changes like update or add files and amend the commit we indicated to edit with the new changes. We can then run git rebase --continue to continue the rebase.
In the example below commits 33bf560, 979e6c4, and b499fc4 will all be applied before the rebase breaks to allow us to edit commit b499fc4, which we specified would be edited.
pick 33bf560 Add third description heading
pick 979e6c4 Create link to blog site
edit b499fc4 Insert section to explain feature
pick 5bd6691 Update numbered list to include more talking points
Squash and Fixup
In this section, we'll be touching on two commands that are very similar. The squash and fixup commands are used to combine the changes of two or more commits into a single commit. Since commits are executed from top to bottom we can only squash/fixup the second and subsequent commits. When executing squash/fixup the commits will be melded into previous commits. This means if we use the squash command on the third commit in the list, then that commit will become a single commit with the second in the list.
The difference between squash and fixup is what will happen to the commit messages. When using squash the squashed commit(s)'s message(s) will be concatenated and included in the single squashed commit. When using fixup the folded commit(s)'s message(s) will be discarded in favor of the previous commit's message. If commit authors differ, the previous commit's author will be the author for the resulting single commit.
In the example below commit b499fc4 will be squashed into commit 979e6c4 and the commit message will be concatenated in the resulting commit. Commit 5bd6691 will also be melded into the resulting 979e6c4, but the commit message will be discarded.
pick 33bf560 Add third description heading
pick 979e6c4 Create link to blog site
squash b499fc4 Insert section to explain feature
fixup 5bd6691 Update numbered list to include more talking points
Exec
The exec command has maybe the most limited use case (as far I can see) of all of the interactive rebase menu options. Using exec will essentially execute the indicated line in the shell. This means that we can run additional shell commands throughout the process of the rebase. For example, if we have some changes in the rebase that merit running the tests or compiling the code throughout, we can add add exec dotnet test or exec npm run build to run those commands during the rebase.
The example below will run the dotnet build and dotnet test commands during the rebase as the commits are applied from top to bottom.
pick 33bf560 Add third description heading
pick 979e6c4 Create link to blog site
edit b499fc4 Insert section to explain feature
exec dotnet build
pick 5bd6691 Update numbered list to include more talking points
exec dotnet test
Drop
Last but not least we have the drop command. This command is just as simple as pick. We can use drop when we want to completely drop or exclude a commit from the rebase. So if we want to exclude a particular commit, we can use the following command. Alternatively, we could just delete the line altogether and it would effectively be the same as using the drop command.
drop 33bf560 Add third description heading
That is a complete rundown of all the available options during an interactive rebase. My hope is that understanding how to use each of the commands will help reduce the anxiety that can come about from rebase changes from one branch onto another.